Hosting a dinner party and suddenly notice the dark, grimy lines crisscrossing your once-pristine tile floor? That familiar sinking feeling hits as you realize your grout has seen better days. But before you reach for the harsh chemicals, there’s a quick and easy solution that will leave your floors spotless without the fuss.
In this article, we’ll uncover a game-changing grout cleaning hack that will have your tiles looking brand new in no time. Say goodbye to the days of scrubbing and scraping, and hello to a fresh, clean floor that will impress your guests.
The Science Behind Why Grout Darkens Faster Than You’d Expect
Grout is a porous material, which means it can easily absorb stains, dirt, and grime. Over time, this buildup can lead to discoloration and a grimy appearance. Factors like foot traffic, spills, and even the type of cleaning products used can all contribute to the rapid darkening of grout.
Traditional methods like bleach or vinegar-based cleaners may temporarily lighten the grout, but they can also be harsh and damaging, leading to long-term discoloration and weakening of the grout itself.
That’s where our quick and effective hack comes in. By using a simple, yet powerful solution, you can tackle that stubborn grout without any harsh chemicals.
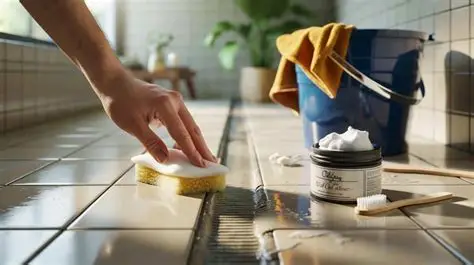
Gathering Your Supplies: What You Actually Need
The best part about this grout cleaning hack is that it requires minimal supplies, and they’re probably already in your home. All you’ll need is:
| Item | Description |
|---|---|
| Baking soda | A natural, gentle abrasive that will help lift and remove grime. |
| Dish soap | A degreasing agent that will cut through built-up dirt and oil. |
| Warm water | To create the cleaning solution. |
| Scrub brush or toothbrush | For agitating the grout and scrubbing away the dirt. |
With these simple ingredients, you’ll be well on your way to a sparkling clean floor without the need for harsh chemicals or expensive cleaning products.
- ➡The Shocking Truth: How My Coworker Stole My Idea and Landed the Big Promotion I Deserved
- ➡Doctors Gave Me 6 Months to Live, But I Defied the Odds 11 Years Later — Then I Got This Unexpected Letter
- ➡Renowned Chefs Reveal Their Mornay Sauce Secrets for Unbeatable Vegetable Gratins
- ➡This Man Found a Vintage Camera at a Flea Market – But the Last Photo on the Roll Was Taken Inside His Own Home
The Step-by-Step Process That Actually Works
Ready to say goodbye to that blackened grout? Follow these easy steps for a professional-level clean:
- Mix together a paste-like solution of 1 part baking soda to 1 part dish soap and warm water.
- Apply the baking soda and soap mixture directly to the discolored grout lines, making sure to cover the entire area.
- Let the solution sit for 5-10 minutes, allowing it to penetrate and break down the grime.
- Using a scrub brush or toothbrush, vigorously scrub the grout lines in a back-and-forth motion.
- Rinse the area thoroughly with clean water, making sure to remove all traces of the cleaning solution.
- Dry the floor completely with a clean, dry cloth or paper towels.
- Repeat the process if necessary for heavily soiled grout.
The combination of baking soda’s mild abrasiveness and the degreasing power of dish soap creates a powerful yet gentle cleaning solution that will lift even the most stubborn grout stains without damaging the surface.
Why This Works Better Than Popular Alternatives
While bleach and vinegar-based cleaners may seem like a quick fix, they can actually cause more harm than good in the long run. Bleach can weaken and discolor grout over time, while vinegar can etch and damage the tile itself.
Our baking soda and dish soap solution, on the other hand, is a gentle yet effective alternative that won’t compromise the integrity of your grout or tile. It’s a safe, natural way to restore your floors to their former glory without the risk of long-term damage.
Plus, this method is much more cost-effective than purchasing specialized grout cleaners or hiring a professional cleaning service.
Making This Solution Last: The Prevention Strategy
Once you’ve got your floors sparkling clean, it’s important to implement a regular maintenance routine to keep them that way. Here are a few tips to help prevent grout discoloration and keep your tiles looking their best:
| Tip | Description |
|---|---|
| Seal the grout | Apply a grout sealer every 6-12 months to create a protective barrier against stains and dirt. |
| Use pH-neutral cleaners | Avoid harsh chemicals and opt for gentle, pH-neutral floor cleaners instead. |
| Wipe up spills quickly | The faster you can clean up spills, the less time the grout has to absorb stains. |
| Sweep and mop regularly | Implement a weekly floor-cleaning routine to keep dirt and grime at bay. |
By following these simple steps, you can keep your tile floors looking their best for years to come without the constant struggle of dealing with discolored grout.
- ➡The Untold Story Behind the Machines That Could Set Us Free (or Leave Millions Behind)
- ➡The Longest Solar Eclipse of the Century — But It Comes With a Catch
- ➡The Shocking Truth About the Underwater Rail Tunnel Linking Continents
- ➡Shocking Reveal: China’s Secret Fishing Fleet Barrier Shakes Up the South China Sea
Common Mistakes to Avoid When Cleaning Grout
While our baking soda and dish soap solution is a game-changer, there are a few common mistakes you’ll want to steer clear of to ensure the best possible results:
- Using too much pressure: Scrubbing too hard can actually damage the grout, leading to cracks and further discoloration. Apply gentle, even pressure instead.
- Letting the solution sit too long: While a 5-10 minute soak is ideal, leaving the mixture on the grout for too long can cause it to dry out and become difficult to remove.
- Forgetting to rinse thoroughly: Make sure to rinse the area completely to remove all traces of the cleaning solution, as any leftover residue can attract new dirt and grime.
- Skipping the sealing step: Neglecting to seal the grout after cleaning can undo all your hard work, as the porous material will quickly become discolored again.
By avoiding these common pitfalls, you’ll be able to achieve professional-level results that last.
Real Results: What You Can Expect
Don’t just take our word for it – see the incredible transformation for yourself! Here’s what one of our readers had to say after trying our grout-cleaning hack:
“I was skeptical at first, but this baking soda and dish soap solution worked wonders on my tile floors. I couldn’t believe how quickly it lifted all the dirt and grime, leaving my grout looking brand new. It’s a game-changer!”
Also Read– Sarah, Homeowner
With just a few simple ingredients and a little elbow grease, you can say goodbye to those unsightly grout lines and hello to a sparkling clean, tile floor that will impress your guests time and time again.
FAQs About Grout Cleaning Without Vinegar or Bleach
Can I use a steam cleaner on my grout?
While steam cleaners can be effective for some floor-cleaning tasks, they are not recommended for grout. The high heat and moisture can actually cause the grout to become further discolored and damaged over time.
How often should I clean my grout?
For best results, plan to clean your grout every 6-12 months, depending on the amount of foot traffic and spills in your home. Regular maintenance will help prevent stubborn stains and discoloration.
- ➡Australia $250 Rule Change: Seniors Payment Impact Explained…
- ➡A $20 Painting Sold for $4.2 Million: The Incredible Story of an Artist’s Extraordinary Comeback
- ➡Microwave vs Oven Cakes — Why the Microwave Is the Surprising Winner
- ➡The Shocking Truth About LED Headlights That Every Driver Needs to Know
Can I use this method on natural stone tiles?
The baking soda and dish soap solution is generally safe for use on most tile types, including natural stone. However, it’s always a good idea to test the solution on a small, inconspicuous area first to ensure it doesn’t cause any damage.
How do I prevent grout discoloration in the future?
In addition to regular cleaning, sealing the grout every 6-12 months and using pH-neutral floor cleaners will help prevent future discoloration and staining.
Can I use this method on colored or epoxy grout?
Yes, the baking soda and dish soap solution can be used on both colored and epoxy grout. Just be sure to test it in a small area first to ensure it doesn’t affect the color or finish.
How do I know when it’s time to replace my grout?
If your grout is crumbling, cracked, or discolored beyond the point of cleaning, it may be time to consider regrout ing your tiles. This is a job best left to a professional for the best results.
Can I use this method on dirty tile floors, too?
Absolutely! The baking soda and dish soap solution can be used to clean and refresh the entire tile surface, not just the grout lines. Just be sure to rinse thoroughly and allow the floor to dry completely.
How can I make this cleaning solution last longer?
Store any leftover baking soda and dish soap mixture in an airtight container for future use. The solution can be reapplied as needed to maintain a clean, sparkling floor.